Build Your Own Smart Mirror with Raspberry Pi: Creating a smart mirror with Raspberry Pi is a fun and practical project. This guide will show you how to build it from scratch. Along the way we will discuss various DIY projects like building motion sensor night lights with Arduino for beginners.
You can also learn how to create a smart plant monitor using ESP32 and sensors. If you are a senior who is new to computers we will also share a simple computer guide. Let’s dive in.
If you’re facing network issues on Windows XP VirtualBox VM check out our guide to fix it. For email migration from Lotus Notes to Outlook without data loss see our Lotus Notes vs Outlook migration tips. If you’re looking for a tablet for seniors consider the best tablet for elderly with large fonts and easy apps to make tech easier.
What is a Smart Mirror?
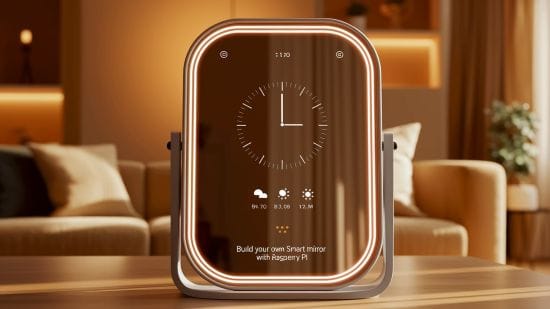
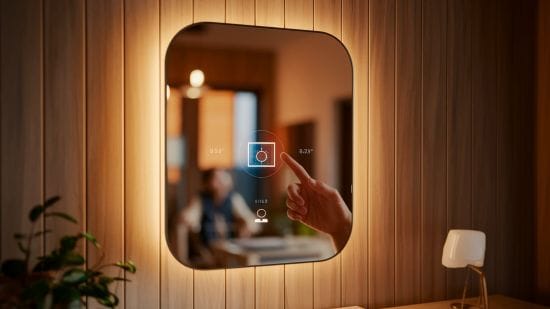
A smart mirror is a reflection surface with an integrated display. It shows useful information like the weather or time. The beauty of a smart mirror is that it looks like a regular mirror when turned off. But when switched on it reveals data right on its surface. This guide uses Raspberry Pi to bring that concept to life.
You can also enhance your smart mirror with other DIY projects. For example you could build a motion sensor night light with Arduino for beginners. This would automatically turn on the light when someone enters the room. You can also make a smart plant monitor using ESP32 and sensors. This monitor will track the health of your plants and display useful data on your smart mirror.
Tools and Materials
Before starting the project gather all the necessary tools and materials. Here is a list:
- Raspberry Pi 3 or 4
- Two-way mirror
- Monitor (LCD or LED)
- Wood or plastic for the frame
- Motion sensor for the night light
- PIR sensor to detect movement
- Jumper wires
- USB keyboard and mouse
- MicroSD card for Raspberry Pi OS
- Power supply for Raspberry Pi
- Smart plant monitor (optional)
You may already have some of these materials at home. If not they are easy to find online or at a local store.
Step 1: Set Up the Raspberry Pi
The first step is to set up your Raspberry Pi. Install Raspberry Pi OS on a microSD card. Plug the Raspberry Pi into the monitor keyboard and mouse. Once everything is connected turn on your Raspberry Pi. You will see the Raspberry Pi desktop interface on the screen. Now your Raspberry Pi is ready for the next steps.
You can also use this setup to follow a simple computer guide for seniors who never used one before. It is easy to navigate and can help seniors understand how to use basic computer functions. If you are helping a senior this step can be a great learning tool.
Step 2: Install MagicMirror Software
Now that your Raspberry Pi is set up it’s time to install the MagicMirror software. MagicMirror is an open-source project that turns your Raspberry Pi into a smart mirror platform. This software will help you display important information on the mirror. You can install it using the terminal.
To install MagicMirror open the terminal on your Raspberry Pi. Then type the following commands:
bashCopyEditgit clone https://github.com/MichMich/MagicMirror
cd MagicMirror
npm install
This will download and install the MagicMirror software on your Raspberry Pi. Once the installation is complete your Raspberry Pi will be ready to display various types of information on the smart mirror.
Step 3: Build the Frame
The next step is to build the frame for your smart mirror. The frame should be designed to hold both the two-way mirror and the monitor securely. You can use wood plastic or any other material that suits your style.
The two-way mirror is what makes your smart mirror work. It reflects like a normal mirror when the screen is off. But when the screen is on you can see the information displayed on it. Attach the two-way mirror to the front of your frame. Then place the monitor behind it ensuring that the screen is centered and well-secured.
Step 4: Add Features to Your Smart Mirror
Now that you have your basic smart mirror set up you can add extra features to enhance its functionality. For instance you can build a motion sensor night light with Arduino. This feature will allow the light to turn on automatically when motion is detected in a room. Using an Arduino board and motion sensors you can create a simple circuit to control the light.
You can also create a smart plant monitor using ESP32 and sensors. This monitor can track various aspects of plant health. You can display things like soil moisture levels temperature and humidity on your smart mirror. This feature is great for keeping track of your plants’ needs.
Another great feature is a timetable maker for teachers in small village schools. Teachers can track their schedules directly on the mirror. This can be a great way to organize daily activities. You could also integrate a free classroom behavior tracker app for primary teachers. This app can be displayed on the mirror to help track student behavior in real-time.
Step 5: Customize the Software
Customizing the MagicMirror software is the next step. MagicMirror comes with several pre-built modules. These modules allow you to display various types of information. Some of the most popular modules include weather forecasts clocks and news updates.
You can also add custom modules to display other types of information. For example you could add a module for the smart plant monitor. This will show the health of your plants right on the smart mirror.
To add a module open the terminal on your Raspberry Pi. Use the following command to install new modules:
bashCopyEditcd MagicMirror/modules
git clone <module-repo-url>
Once the module is added you will need to update the configuration file. You can customize which modules you want to display and how they should look.
Step 6: Setting Up Motion Detection
If you want to add a motion sensor feature to your smart mirror you will need to set up a PIR sensor. A PIR (Passive Infrared) sensor detects motion and can trigger an action based on movement. In this case it will trigger the motion sensor night light built with Arduino.
Connect the PIR sensor to your Raspberry Pi using jumper wires. Then configure it to activate a light when movement is detected. You can also use the motion sensor to turn on the mirror’s display when someone approaches.
This will make your smart mirror even more interactive. It will turn on only when someone is in the room. This adds convenience and saves energy.
For teachers looking to enhance offline learning explore the best quiz apps for offline classrooms. If you’re into DIY projects try our guide on how to build your own smart mirror with Raspberry Pi. Finally if privacy is your concern learn how to self-host Bitwarden alternatives for better control.
Final Touches
Now that your smart mirror is complete you can give it some final touches. Add your personal preferences to the display. You can show information such as weather news calendar events or social media feeds. You can also adjust the brightness of the screen so it’s not too bright in the dark.
If you want to add even more features you can integrate voice control. Using Alexa or Google Assistant you can control the mirror with voice commands. You can ask for the weather or even set reminders.
Pros and Cons of Building a Smart Mirror
Here is a table summarizing the pros and cons of building a smart mirror:
| Pros | Cons |
|---|---|
| Fun and educational project | Requires time and effort to build |
| Customizable with different modules | Can be challenging for beginners |
| Offers practical features like weather updates | Requires additional hardware for advanced features |
| Enhances your home with a high-tech gadget | Might be costly depending on materials used |
| Can be integrated with other DIY projects like motion sensors and plant monitors | Needs a Raspberry Pi and other tech skills |
FAQs:
Can a beginner build this smart mirror?
Yes. Use a Raspberry Pi and follow online guides. Many steps need no coding.
Can I use the mirror without internet?
Yes. You can show local time and calendar. But online weather and emails need internet.
Is it safe for seniors?
Yes. Display is clear and voice commands make it easy. Use simple computer guide for seniors.
What can teachers do with it?
They can show schedules. Use easy timetable maker for teachers in small village schools to sync data.
Can it display plant data too?
Yes. Connect smart plant monitor using ESP32 and sensors. Show soil moisture and other stats.
Code Here: